SolidWorks Tutorial
A free training course
One thing you hear constantly today from companies is that no one has the time or money to train anyone. Then the same companies go on to complain that they cant find good people.
When I started drafting in the 1970's, I was first trained by my employer, as were most mechanical designers and drafters at the time.
It's a vicious cycle for young people wanting to enter the field today because no one wants to train them. Well fortunately one solution is for anyone wanting to become a designer is to train themselves.
Nowadays, with the internet, that is possible. It's not one on one training, but its the next best thing.
A way to get your foot in the door at least.
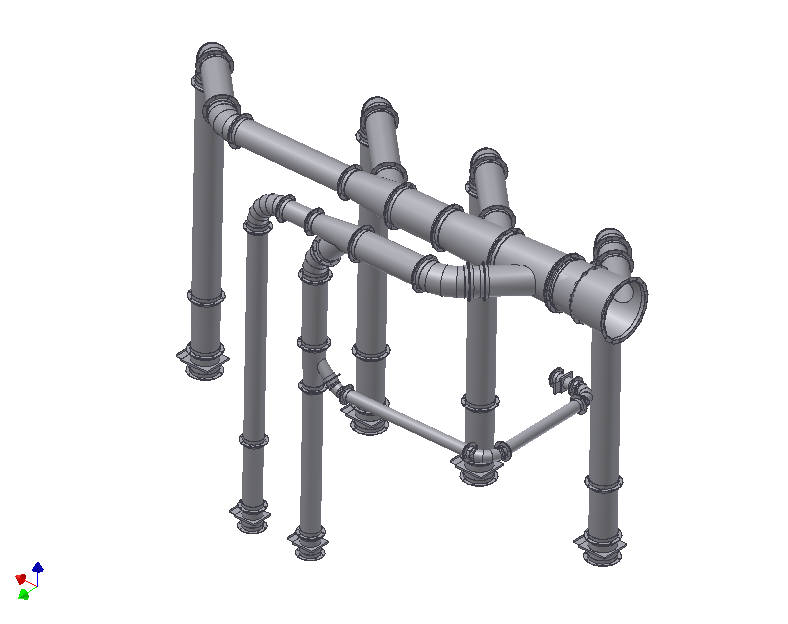
To get you started I am starting my own training course. This tutorial takes you through an entire drafting and design project. In this case its a blower table, a fairly simple project but one which touches on most of the important aspects of mechanical drafting.
Through a succession of YouTube video's you can see how I set up all the models and drawing documents, solving problems and documenting the project as I go. It's not just drafting skills either, I am giving up a lot of practical shop knowledge so you can get a handle on things are actually made.
Video #1 - "From sketch to model"
The first video, starts with the blower table itself and contains the following:
- Getting information from the customer sketch
- Setting up a weldment in SolidWorks
- Drawing and dimensioning a sketch
- Using a structural steel library
Video #2 - "The model gets some legs"
Video number 2, carries on with adding the six square tubes which make up the legs of the table. It touches on these points:
- Using a sketch thats the actual size of the object you are creating
- How the apparent intersection of a tube sketch can be used to line up the first of the legs
- Placing 6 legs on the table using mirroring and patterning of bodies
- Editing the center legs when get them in the wrong place !
Video #3 - "The Table Top"
Video number 3, shows how I place the table top and also how a center brace gets added:
- Making use of existing sketch geometry to place the center brace.
- Allowing space for the weld bead when placing the table top.
- Why multi body parts are better than assemblies - sometimes.
Video #4 - "Gusset - Mania"
In Video number 4, I have a pile of gussets to add, 12 in total, 2 on each table leg. Here's how I go about adding them in:
- Using a single line sketch and extruding it in two directions for thickness and width.
- Making use of existing geometry so you dont have to dimension anything.
- Making use of the rollback bar to add the gussets to mirrors and patterns created previously.
Video #5 - "Holy Baseplates Batman!"
Our nice strong table needs some nice baseplates to sit on, with holes in them so the table can get bolted to the ground. The video talks about :
- Centering a simple sketch using construction lines .
- Considering wrench clearance when making holes for bolts and nuts.
Video #6 - "Naming your stuff"
The table gets finished off with a nice big hole on one and then we proceed to setting up the bill of material or cutlist. I talk about some ways you can set this up so it makes life easier for those who have to work with the drawing :
- Using "update" to collect all the like items and group them into folders.
- How to manually make folders when update does not recognize identical parts .
- Adding properties like "description" to the cutlist in a formalized way,to help purchasing and cutting.
- Adding "material" so that everyone knows what you want to use.
- Adding "weight" and how that is used in costing.
Video #7 - "Honkin Great Motor"
Now that we have a nice strong table it seems to make sense to put a honkin great motor on it. So in this video I show how I used the WEG website to download the necessary files for the 40 HP 324T frame motor thats needed for this project.
I like the WEG site because they have done a very thorough job of providing a wide range of electric motors for use in just about any CAD system. I also talk a little bit about SolidWorks own 3D Content Central :
- Selecting NEMA motors.
- Choosing the frame style.
- Picking the right CAD system filetype to download.
- Selecting where the junction box will go.
- Opening and IGES file ans saving it as a part file.
- Dropping the electric motor into the assembly for use later on.
Video #8 - "Motor bases loaded"
The motor needs to sit on a slide base because it weighs almost 400lbs and you cant exactly tighten the belt by dragging the motor by hand.
I found a nice motor base, one thats not that expensive either, but the company has no 3D model or many dimensions so this Video shows how I set out to model this base for my drawing.
Heres what I needed to do:
- Make a reference sketch from the bolt hole dimensions on the motor.
- Copy the construction as best I could from the picture on the internet.
Video #9 - "Motor bases loaded"
This video completes the modeling of the motor base. I get the basic size and shape, so I have something to put underneath the motor. The manufacturers website for the base does not give any dimensions, so I will have to call them to see if they will help out.
But just by looking at the photograph from the website, I was able to get an idea about how this base is put together. The base has slots which allows the motor to slide so the millwright who is setting it up can get the drive belt tightened.
The motor base also has a seperate sliding frame moved by long fine thread bolts. That way the millwright can move the motor with powered socket wrenches instead of by hand or 2x4's. I didnt model this, but its important that this base has that feature considering the weight of the motor.
Heres what I needed to do:
- Used the reference sketch I made to find the location of slots in the motor base.
- Added some angles to join the motor base frame together.
- Made some mounting holes in the base so we can bolt it onto the table.
Video #10 - "The table gets a blower"
After going to all the trouble to make this fancy table, we need to put the star attraction on it - the blower. Its very similar to the superchargers you see on top top of dragster engines. But the problem is I only have a 2D autocad drawing from the manufacturer, no 3D model.
To get around that I started by saving out the right side, top and front views as seperate autocad drawings and them imported them into Solidworks as a sketch. Heres the process I followed:
- Imported each of the three new AutoCad views by just opening the .DWG file in SolidWorks
- Converted the resulting SolidWorks sketch to a block so I could easily line it up on the planes of symmetry.
- Started sketching over top of the blocks and extruding the sketches to create the basic shape of the blower relying entirely on the imported geometry, no dimensions.
- Created blower as a multibody part, so I could show major parts such as end caps and mounting feet, that were bolted on
AAA Drafting > Mechanical drafting tutorial
Using SolidWorks > The most popular 3D modeler